
Piercing Pattern
Gaps down, rallies past midpoint
- By
- 42Fibonacci
- Updated
- Read time
- 8–10 min
A Piercing Pattern is a two-candle bullish reversal after a downtrend where the second candle gaps down, then rallies to close above the midpoint of the first candle's body but below its open. That partial takeover, defined by the midpoint rule, needs a later close above the second candle's high to confirm it.
- Type
- Two-candle partial reversal
- Story
- Sellers gap it lower — buyers reclaim more than half
- Key rule
- Close must be above the midpoint of the prior body
- Mirror
- Dark Cloud Cover (bearish version)
- Gap
- Strict rule: open below prior low; relaxed rule: below prior close
- Confirmation
- A later close above the second candle's high
- Fails
- On a close below the second candle's low
What Makes a Piercing Pattern
The Piercing Pattern is a two-candle bullish reversal signal that appears after a downtrend. The first candle is a strong bearish session — sellers are in control. The second candle gaps down at the open (below the prior low), then rallies hard and closes above the midpoint of the first candle's body — but below its open.
That partial recovery is what defines the pattern. It's not a full reversal — it's a statement: sellers had every advantage (the gap down, the momentum, the trend), and they still couldn't hold the low. Buyers reclaimed more than half the prior session's losses in a single candle.
Honest fine print on the gap: “opens below the prior low” is the strict, classic rule — and in that strict form the pattern shows up far less often than what relaxed-rule scanners surface. A widely used relaxed version only requires the open below the prior close, and on 24-hour markets, where true gaps barely exist, the relaxed rule — or dropping the open requirement entirely — is the practical one. Know which version a source uses; the two camps rarely acknowledge each other.
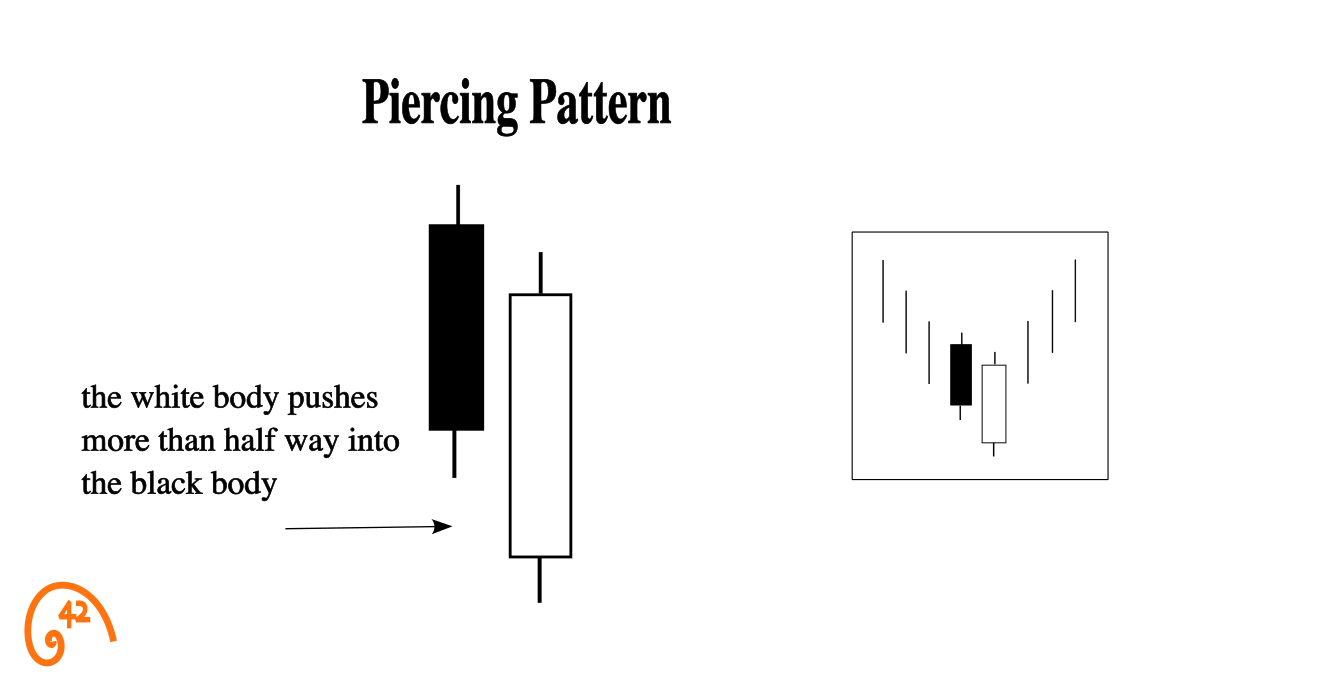
- First candle
- A strong bearish (red) candle with a large real body. Sellers were in control for the entire session.
- Gap down
- In the classic form, the second candle opens below the first candle's low. The gap adds to the story — sellers pushed even further overnight — but the close past the midpoint is the rule.
- Second candle close
- Closes above the midpoint of the first candle's body, but below its open. This partial recovery is the signal.
How a Piercing Pattern Forms
Every two-candle pattern is a compressed story told across two sessions. The Piercing Pattern's story is about overreach — sellers pushed too hard, and buyers called the bluff.
"Another heavy red day. The trend is intact. No reason to step in."
The first candle is a strong bearish session — a large red body with sellers in control from open to close. It confirms the existing downtrend and discourages any buyers from stepping in. This is the setup candle.
"It gapped below yesterday's low. This thing is in free fall."
The second session opens below the first candle's low — a gap down. Sellers pushed price even lower overnight. At the open, everything looks like the decline is accelerating. This is where most traders see weakness and either sell or stay away.
"Wait — it's climbing. They gapped it down and buyers are taking it back."
Throughout the session, buyers absorb the selling and push price higher. By the close, the second candle has recovered more than half of the first candle's body. The gap down that looked like capitulation turned into a springboard. Sellers overplayed their hand.
Here's the key insight: the Piercing Pattern doesn't prove buyers have taken over. It proves sellers couldn't hold their best position. They had the trend, the momentum, and the gap — and they still gave back more than half. That's what the pattern shows.
Whether that crack turns into a full reversal depends on what happens next. But the shift in intraday control — from gap-down panic to close-above-midpoint recovery — is a real change, and that is why the next close matters.
Is a Piercing Pattern Bullish or Bearish?
Bullish by name. The Piercing Pattern only exists after a downtrend, and its entire meaning is a partial bullish takeover. But definitionally bullish is not automatically tradeable: it still needs a real downtrend behind it, a clear support level, and a later close above the second candle's high (often the next session) before it deserves capital. (Its bearish mirror — the Dark Cloud Cover — is covered below.)
How reliable is it? We deliberately don't quote a win rate. The pair alone doesn't settle the direction: buyers took back more than half of the red body, but sellers still hold the rest. A later close above the second candle's high confirms the bullish read; a close below its low fails it. Two cautions: a pattern that forms while price is still under a falling 200-day moving average is fighting the bigger trend, and the strict gapping form is uncommon — much of what a scanner surfaces is the relaxed version, where context and confirmation carry more of the load.
The Midpoint Rule
The midpoint rule is what separates a Piercing Pattern from a weak bounce. Here's exactly how it works.
Take the first candle's open (the top of the bearish body) and its close (the bottom of the bearish body). The midpoint is the average of those two prices:
Midpoint = (First candle open + First candle close) / 2
For the pattern to qualify as a Piercing Pattern, the second candle must close above this midpoint. If it closes below the midpoint, the recovery wasn't strong enough — buyers didn't reclaim enough ground to matter.
Why does the midpoint matter? Because it represents the psychological halfway point of the prior session's selling. When buyers push the close above it, they've erased more than half of the prior bearish conviction. That's the threshold where the recovery shifts from "dead cat bounce" to "something may be changing."
The closer the second candle's close gets to the first candle's open — without exceeding it — the more of the prior selling it takes back. A close just barely above the midpoint is the minimum qualification. A close near (but below) the prior open is almost an Engulfing. And if the close pushes above the prior open, the pattern has graduated: you're looking at a Bullish Engulfing, the complete version of the same takeover.
At the other end, a green candle that opens far lower and gets back only to the prior close, taking back none of the red body, is Bullish Counterattack Lines.
Piercing Pattern vs. Dark Cloud Cover
The Piercing Pattern has a direct bearish counterpart: the Dark Cloud Cover. Same mechanics, opposite direction. If you understand one, you already understand the other.
- Appears after a downtrend
- Gap down, close above the midpoint of the prior bearish body
- Signals buyers reclaimed more than half — potential bottom
- Appears after an uptrend
- Gap up, close below the midpoint of the prior bullish body
- Signals sellers reclaimed more than half — potential top
The midpoint rule is the same in both: the second candle's close must cross the halfway point of the prior body to qualify. The gap (down for Piercing, up for Dark Cloud) adds to the story: the side that pushed overnight still lost ground by the close.
How to Trade the Piercing Pattern
The Piercing Pattern is a partial signal — the recovery is real but incomplete. That asymmetry demands more confirmation than a clean reversal does. Here's how to approach it systematically.
Confirm the downtrend is real
The Piercing Pattern only matters after a sustained decline — multiple sessions of lower highs and lower lows. A Piercing Pattern after a two-day dip in a range is noise. You need genuine bearish momentum for the pattern to reverse.
Verify the midpoint rule
Calculate the midpoint of the first candle's body: (open + close) / 2. Confirm the second candle's close is above that level. If it's below, the pattern doesn't qualify — the recovery wasn't strong enough. This is a hard requirement, not a suggestion.
Check for structural support
Look for levels where buyers have reason to show up: prior support zones, moving averages, Fibonacci retracement levels. A Piercing Pattern in open space has no such level under it.
Wait for confirmation
Because the Piercing Pattern is a partial takeover — the second candle doesn't fully engulf — it needs a later close above the second candle's high, often the next session. That follow-through proves the recovery has legs.
Define your stop
The natural stop is below the second candle's low (the gap-down low). If price breaks below the point where buyers launched the recovery, the pattern has failed. Set this before you enter, not after.
A stock gaps down 2% at the open after a 3-week decline. During the session, buyers push the price up aggressively. By the close, the candle has recovered to close exactly at the midpoint of yesterday's bearish candle — right on the line. Volume is above average.
Is this a valid Piercing Pattern, and would you trade it?
It's borderline. The midpoint rule says the close must be above the midpoint, not at it. 'Right on the line' typically isn't enough — you want clear evidence that buyers pushed past the halfway mark. However, the strong volume and gap recovery are positive signs. If other context supports it (at support, RSI oversold), you might watch for follow-through the next session. But don't treat it as a confirmed Piercing Pattern — treat it as a setup that needs extra confirmation.
Reading the Piercing Pattern in Context
Four lenses decide whether a Piercing Pattern is a signal or just noise: volume, structure, momentum, and the level it forms at. Each gets its own dedicated guide; this is the quick orientation.
Volume — was the recovery fought or drifted into? The session opens on heavy selling — the gap down looks like capitulation. Then volume picks up on the buy side as price climbs back above the midpoint. That mid-session handoff is what separates a real Piercing Pattern from a quiet drift higher. Candlesticks + Volume guide →
Structure — where on the chart did it form? A midpoint close that also reclaims a moving average, a prior support zone, or a Fibonacci retracement has structure under it that a midpoint close in open space lacks. The pattern shows buyers reclaimed more than half in one session. Structure tells you why they showed up where they did. Candlesticks + Moving Averages guide →
Momentum — was the dominant side stretched or just resting? Check RSI heading into the pattern. A reading near or below 30 means sellers were already exhausted, so the recovery comes after selling that was already stretched. If RSI is mid-range, sellers were not stretched, so the pattern has more to prove. Candlesticks + RSI guide →
Levels — did the recovery happen where traders are watching? A Piercing Pattern in the Fibonacci golden pocket of a pullback is a midpoint-beating recovery at the exact zone many traders expect the trend to resume — the partial takeover gets a reason. The same pattern between levels is just a bounce. Read the Candlesticks + Fibonacci guide →
Pattern tells me where to look, context tells me whether to act.
Seeing the Piercing Pattern in Action: $EW
Here's a Piercing Pattern that printed at the bottom of a multi-week slide — exactly the kind of context the pattern needs to mean something.

Before the Piercing Pattern. Edwards Lifesciences ($EW) had been sliding from late May into late June 2025. From around $78 the stock ground steadily lower — session after session of lower highs and lower lows, with no meaningful bounces. By the end of June, price was sitting near $73, a level that had acted as support earlier in the year. RSI had been declining alongside price and was approaching oversold.
The Piercing Pattern prints. A long red bearish session continues the decline. The next session opens with a gap below the prior low — at the open, everything looks like the slide is accelerating. But buyers absorb the selling and rally price all day. By the close, the green candle has reclaimed more than half of the prior body, with the close landing comfortably above the midpoint of the prior open and close — but short of the prior open.
The next session. Confirmation arrives the following day: price closes above the high of the piercing candle. The partial recovery extends into real follow-through. Sellers had every advantage going into the gap and still couldn't hold the low — and the next session said the same thing.
Why this one was tradeable. Four conditions stacked: a multi-week downtrend (real selling pressure to undo), the ~$73 support zone (a level buyers had defended before), the midpoint cleared with room to spare (not just barely qualifying), and confirmation the next session. The advance that followed ran roughly ten candles, eventually retracing back toward the prior $78 area.
Common Piercing Pattern Trading Mistakes
The Piercing Pattern's subtlety is both its strength and its trap. Because it's a partial signal, it invites interpretation — and interpretation invites mistakes.
| Mistake | Instead |
|---|---|
| Eyeballing the midpoint instead of computing it The recovery looks strong enough — close to the middle, probably counts. | Pull out a calculator: add the first candle's open and close, divide by two. If the second close lands at or below that number, the math says the buyers did not reclaim enough ground — whatever the chart looks like. Partial-signal patterns leave no room for "basically." |
| Applying the pattern in environments without real selling pressure The shapes line up perfectly in a chop zone — good enough, take it. | The Piercing Pattern earns its meaning by undoing part of an established decline. Inside a range, there is no established decline; the pattern becomes two ordinary candles with no story attached. The decline is what makes the recovery interesting. |
| Misunderstanding the gap's role No gap below the low, so the pattern is worthless. | The close past the midpoint is the rule. A gap below the prior low adds to the story — sellers extended their control overnight and still lost ground — but many traders accept an open below the prior close instead. Know which version you're reading. |
| Tightening the stop to make the trade look better If I put my stop just a few cents below my entry, the risk-reward math looks great — I'll do that. | The pattern only fails if price breaks below the second candle's gap-down low — that's the level that matches the trade. A stop closer than that will get hit by normal price noise long before the pattern has actually failed. If the real stop distance makes the trade unattractive, the answer is to skip the trade, not move the stop. |
| Overconfidence after one partial candle The Piercing Pattern formed — load up, the bottom is in. | A partial reversal signal deserves partial conviction. Wait for confirmation. Size appropriately. The Piercing Pattern is a hint, not a guarantee — treat it that way. |
- The Piercing Pattern is a two-candle partial reversal — the second candle gaps down but closes above the midpoint of the first candle
- The midpoint rule is a hard requirement: (first candle open + close) / 2 defines the minimum threshold the second candle must clear
- The close past the midpoint is the rule; a gap down adds to the story but is not required by every definition
- It is a partial takeover: more than an On-Neck, less than a Bullish Engulfing, which takes back the whole body
- Wait for a later close above the second candle's high, often the next session — don't skip it
- Read the midpoint close alongside structural support, volume, and momentum
- Define your stop below the second candle's gap-down low before entering — that's where the recovery launched
Frequently Asked Questions
What is the midpoint rule?
The midpoint rule defines the minimum threshold for a valid Piercing Pattern. Calculate the midpoint of the first candle's body: (open + close) / 2. The second candle must close above this level. If it doesn't, the recovery wasn't strong enough and the pattern doesn't qualify as a Piercing Pattern.
What is the difference between a Piercing Pattern and a Bullish Engulfing?
Both are two-candle bullish reversals where the second candle opens below the prior close and rallies. The difference is how far the recovery goes. A Bullish Engulfing closes above the first candle's open (complete reversal). A Piercing Pattern closes above the midpoint but below the open (partial reversal), so it needs a later close above the second candle's high.
Does the Piercing Pattern work in uptrends?
No. The Piercing Pattern is a bullish reversal pattern that only applies after a downtrend. The bearish equivalent — a gap up followed by a close below the midpoint of the prior bullish candle — is called the Dark Cloud Cover. Same structural logic, opposite trend context and direction.
How reliable is the Piercing Pattern?
Reliability depends on context. A Piercing Pattern after a sustained downtrend, at a key support level, with above-average volume and followed by confirmation has a trend to reverse, a level under it, participation and a confirming close; one in a shallow pullback with no structural support has little of that. Check each before trading it.
Where should I place my stop loss?
Below the second candle's low — the bottom of the gap-down. That's where buyers launched the recovery. If price breaks below it, the rejection failed and sellers are back in control. Define this level before you enter the trade so your invalidation point is framed in advance.
Why does the gap down matter?
The gap down adds to the story, though the close past the midpoint is the rule. It means sellers pushed price lower overnight, beyond the prior session's low. When buyers then rally price back above the midpoint despite that extended selling, it shows genuine demand — not just short covering on a normal open. Note that the strict below-the-low gap is rare on stock charts; a widely used relaxed rule only requires the open below the prior close.
Is a Piercing Pattern bullish or bearish?
Bullish by name. The Piercing Pattern only exists after a downtrend, and its whole meaning is a partial bullish takeover: buyers reclaiming more than half of the prior bearish body. But definitionally bullish is not automatically tradeable — it still needs a real prior downtrend, a clear support level, and a later close above the high of the second candle, often the next session, before it deserves capital.
What is the Dark Cloud Cover pattern?
The Piercing Pattern's bearish mirror. After an uptrend, a strong bullish candle is followed by one that opens above it (strictly, above its high) and closes below the midpoint of its body — but above its open. Same mechanics, opposite direction: a partial bearish takeover that warns the rally is losing control, and that needs its own bearish confirmation.
The Bottom Line
The Piercing Pattern teaches you something most clean reversal patterns don't: reversals aren't always complete. Sometimes "enough" is enough.
When sellers gap price down, push it below the prior low, and still can't hold buyers back from reclaiming more than half the prior session's losses — that's information. It's not as loud as an Engulfing. It's not as clean. But it's real.
Learning to read partial signals — where the reversal is implied rather than stated — is what separates beginners from experienced chart readers. The Piercing Pattern is your introduction to that skill. Master the midpoint rule, demand confirmation, and know which gap rule you're using. The rest is context.